Lab 3 Warmup
Lab 3 Warmup
- Lab 3 Home
- Warmup
- Part 1
- Part 2
- Part 3
- Submission
Part 1 – Testing
Create a new Java project called Warmup 3. Create a new class called
DataSet with package warmup3. Copy all of the code from
here into DataSet.java.
DataSet is a simple class that contains an ArrayList of Doubles and can
compute some very simple statistics on them. Let’s write some tests to make
sure that our new class behaves the way we want. In particular, we are going
to want to write tests for each of our nontrivial methods.
Create a new JUnit test case via File > New > JUnit Test Case. As long as
you do this while DataSet.java is open, Eclipse should fill in all the
correct values:
- New JUnit Jupiter test
- Package:
warmup3 - Name:
DataSetTest - Class under test:
warmup3.DataSet
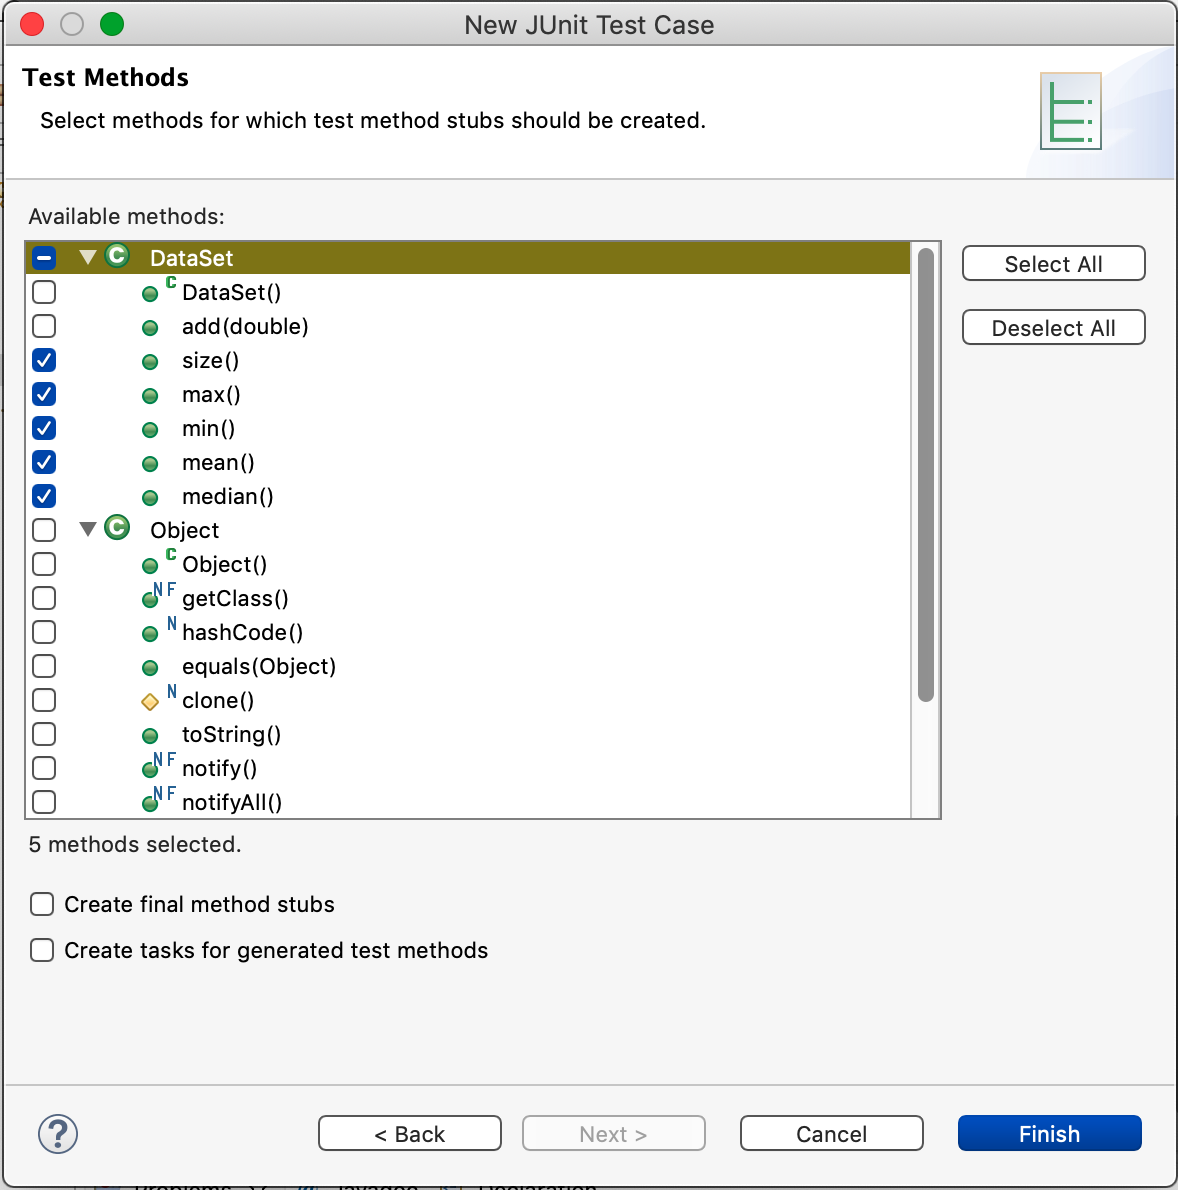
Click Next (not Finish) and Eclipse will ask what methods you want to
create test method stubs for. Select all of the method so DataSet except for
the constructor DataSet() and add(double).

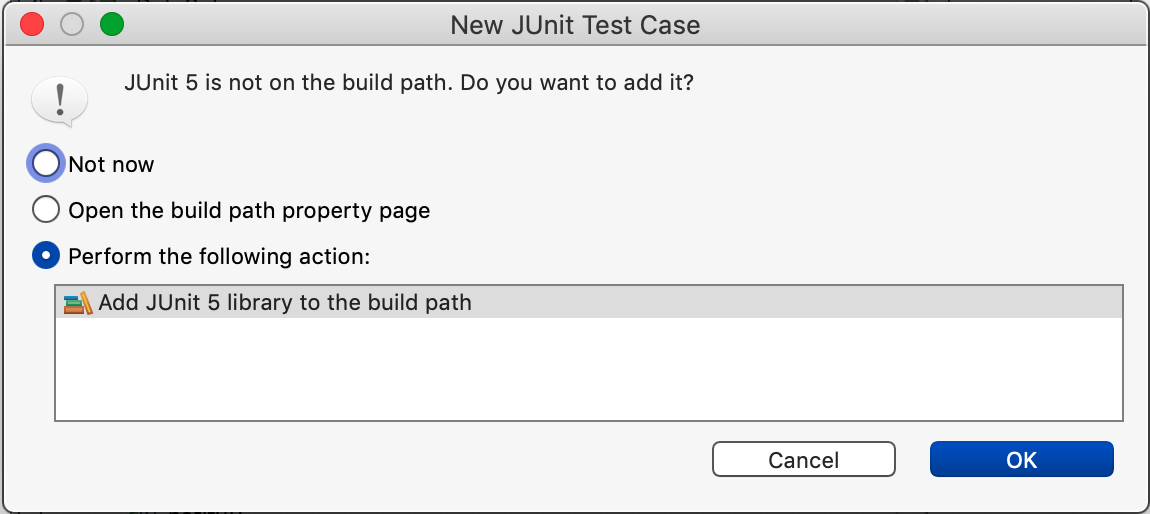
Eclipse may tell you that “JUnit 5 is not on the build path.” Click OK to
add the JUnit 5 library to the build path.

This will create a new class named DataSetTest. It’s traditional that when
writing unit tests for a class Thing, the test class is named ThingTest.
There are two import lines in DataSetTest.java (Eclipse may have collapsed
them into a single line; if so click the small + icon to the left of the
import line to expand it). The first imports the assertion methods we can use
to write tests. The second imports the @Test annotation which we’ll use to
indicate that the method should be run as a test. If you get errors on the
import lines after Eclipse created the class, you probably have a
module-info.java file. Delete it and everything should work.
Before we do anything else, let’s run our test by selecting “Run” from the “Run” menu. This will open up a “JUnit” tab and, if all has gone according to plan, show
Runs: 6/6 Errors: 0 Failures: 6
Each of the generated fail() calls caused that test to fail.
Let’s start by testing the size() method. Inside your testSize(), delete
the fail(…); and create a new DataSet ds = new DataSet();. Start by
testing that it starts out with no elements. Enter
assertEquals(0, ds.size());
on the next line. assertEquals(expected, actual) will test that actual is
equal to expected and if it is not, then the test will fail. There are many
similar assertion methods. Most of them take an optional String to display
if the assertion fails. Here is a partial list of the supported methods where
the [, message] indicates the optional String argument.
assertEquals(expected, actual [, message])— asserts thatactualis equal toexpectedassertNotEquals(unexpected, actual [, message])— asserts thatactualis not equal tounexpectedassertTrue(condition [, message])— asserts thatconditionistrueassertFalse(condition [, message])— asserts thatconditionisfalseassertNull(actual [, message])— asserts thatactualisnullassertNotNull(actual [, message])— asserts thatactualis notnullassertThrows(expectedType, executable [, message])— asserts thatexecutablethrows an exception of classexpectedType; see below for detailsfail(message)— fails the test with the given message
Check out the JavaDoc for a list of all of them.
Run the tests again. You should see
Runs: 6/6 Errors: 0 Failures: 5
Go ahead and add a few more elements to the data set and test the size by
adding appropriate assertEquals() statements.
So far, everything is looking good; however, it’s a good idea to make sure
that your tests are actually being run. The way to do that is to change your
test to be deliberately wrong. When you run the tests, it had better fail! Go
ahead and do so now. When you run the tests you should see the method in the
list of failures. On the bottom left quadrant of the Eclipse window, you
should see Failure Trace. If you double click on the line that says
org.opentest4j.AssertionFailedError, it’ll show you what the actual and
expected values were.
Okay, fix your test and now write a test for max(). Make sure you add some
positive and negative numbers to your DataSet. Run your tests. You should
have fewer failures than before.
Create a test for min(). You can duplicate your test for max(), give it an
appropriate name, and modify any assertion statements appropriately.
If all the tests you have written up to this point pass, then I have some bad
news: your testing was insufficient. Go back to your tests for max and
min. Create multiple DataSets and assert the values of max() and
min(). Try creating one that only has positive numbers; one that only has
negative numbers; one that only has the same number. Try to think of any other
edge cases and test those.
Which values inserted into your DataSet caused the method to fail?
Part 2 – Debugging
It’s now time to debug what went wrong. For that, we can use the debugger. Find the line of the assertion that failed. Double click on the line number. This will cause a small blue dot to appear. This indicates a “break point.” When you run the code in a debugger, each time a break point is reached, the debugger will stop and give you control. From the Run menu, select Debug. (Select “Switch” if Eclipse asks if you want to switch to the debugging view.) This will cause the tests to run until the line with the break point is reached.
In the new debugging view, there are several important things to notice. The
left pane shows a “stack trace.” This is a list of all of the methods that
were called to reach the current location. You’ll notice there are a lot of
them. Most of them are irrelevant; they’re part of the JUnit testing
infrastructure. The top line should be DataSetTest.testXXX() corresponding
to the method the breakpoint is in.
The right pane has three tabs. The “Variables” tab shows the values of the variables that are in scope. This is invaluable for figuring out what’s going on. No more adding print statements to see what the values of variables are, the debugger will show you!
At the top of the window are a few nondescript buttons.  . From left to right, they
are Resume, Suspend, Terminate, Disconnect (we won’t need this), Step Into,
Step Over, and Step Return. Right now, Eclipse is in single-stepping mode
meaning we can step through statements one at a time. Step Over will execute
the statement and move to the next. Step Into does the same unless the
statement includes a method call in which case it will step into the method
so that we can single step inside of it.
Click the Step Into button (or press F5) to step into the method that failed the assertion. Step through the method using Step Over (or F6). After each step, examine the contents of the Variables tab on the right to make sure that the variables have the values you expect.
Once you have figured out the bug, you can stop debugging by clicking Terminate. Fix the bug and rerun your tests. Hopefully, it’s passing now. If not, start the debugger again and give it another go. Debugging is an iterative process. It’s not uncommon to need to spend more time debugging code than writing code.
Part 3 – Remaining tests
Implement tests for mean() and median(), fixing any bugs in the code your
tests uncover. Recall that the mean of n numbers x1 through xn is (x1 + x2 +
… + xn)/n. In contrast, the median of n numbers is the middle value if n is
odd and the mean of the two middle values if n is even. E.g., the median of 5,
3, and 100 is 5. The median of 5, 3, 100, and 6 is 5.5.
At this point, all of your tests should pass.
Part 4 – Exceptions
Finally, we need to handle some exceptional cases. What happens if we call
max(), min(), mean(), or median() if the DataSet is empty?
Let’s change that behavior to throw an IllegalStateException if the
DataSet is empty. Add the following code to the beginning of each of those
four methods.
if (data.isEmpty()) {
    throw new IllegalStateException("DataSet is empty");
}
Now we just need to add some assertions to our code that when we call those
methods with an empty DataSet, we get an the exception. To test that an
expression throws a particular exception, we need to use assertThrows with
some new syntax. Here’s the test for max().
assertThrows(IllegalStateException.class, () -> ds.max());
The first argument, IllegalStateException.class, says that the expression
under test should throw an IllegalStateException. The second argument, ()
-> ds.max(), is Java’s syntax for an anonymous method that takes no arguments
and simply computes ds.max().
Add similar assertions to each of the four methods that should throw. Make
sure you change ds.max() to call the appropriate method for each test.