Lab 1 Warmup
Lab 1 Warmup
- Lab 1 Home
- Warmup
- Part 1
- Part 2
- Part 3
- Submission
Part 1 – Command line arguments
Create a new folder for your project called Warmup1. Create the Java project
in Eclipse by selecting File > New > Java Project. Give it the project
name Warmup 1. Uncheck the Use default location box. After you uncheck
this box, the Location textbox becomes active. Use the browse button to
select the Warmup1 folder you created at the start. Make sure Create
module-info.java is unchecked. Click Finish. 
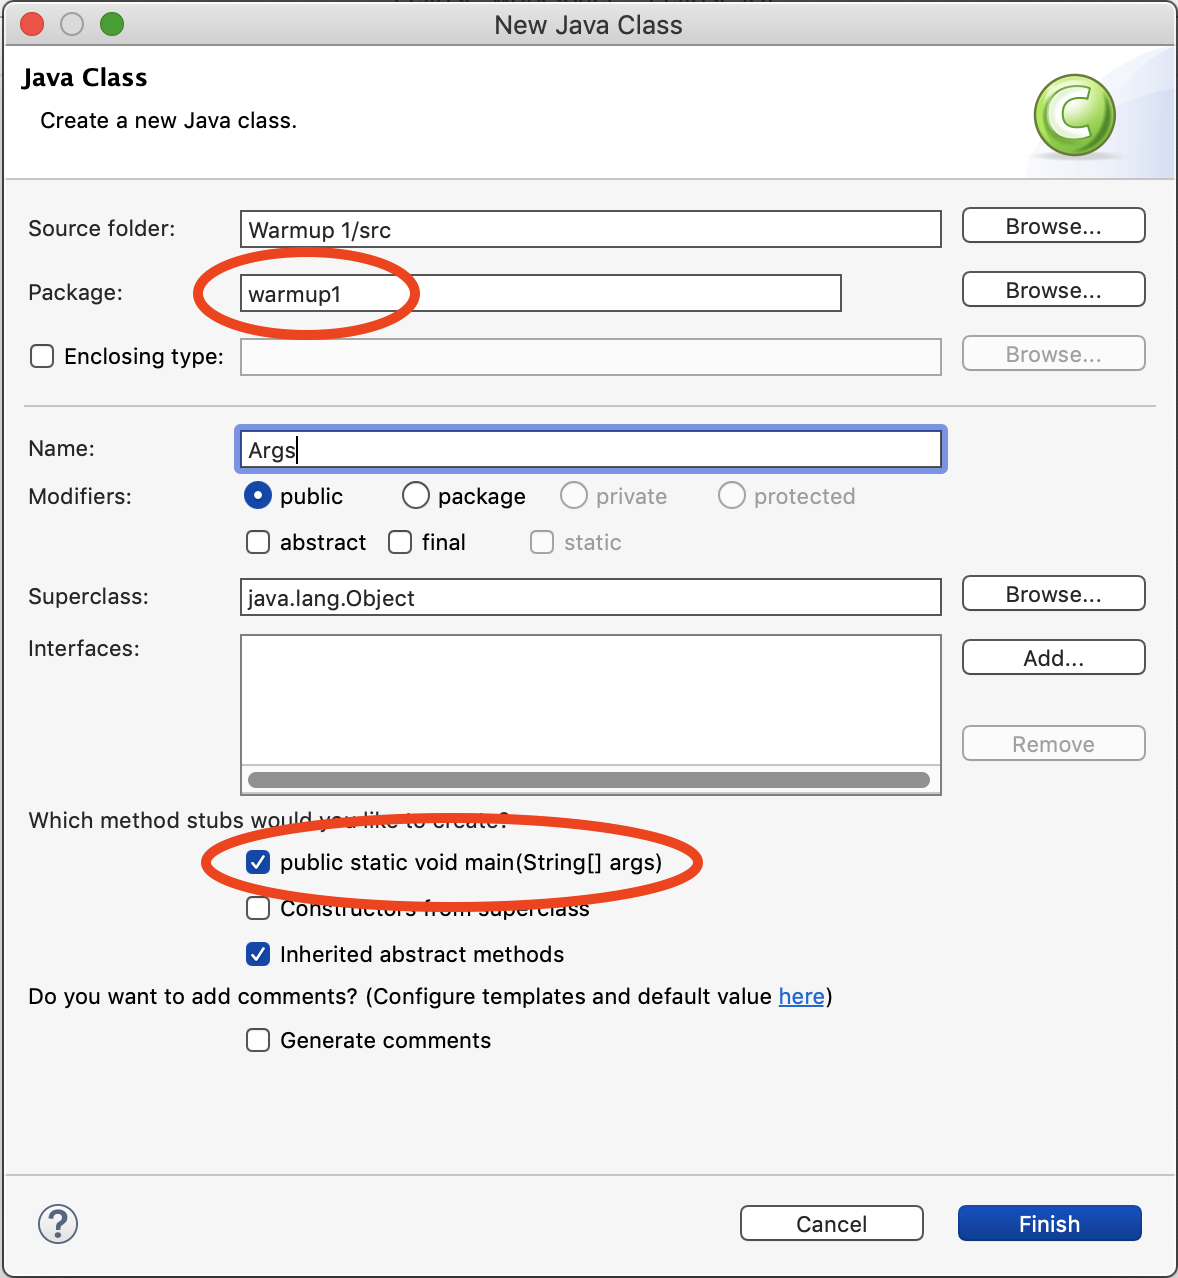
Highlight Warmup1, then select New from the File menu and Class from
the popup list. This brings up the New Class window, which should already
have Warmup1/src as the source folder. If this is not the case use the
Browse button to navigate to this folder. Next, it asks for a package name.
Use warmup1 for this. Use Args as the name of the class and check the
button for including a public static void main stub. Click the Finish
button at the bottom and you are ready to start coding. 
You should now have a new file Args.java with the contents.
package warmup1;

public class Args {

    public static void main(String[] args) {
        // TODO Auto-generated method stub

    }

}
The main() method is the entry point to your program. It is passed an array of
Strings corresponding to the command line arguments.
Let’s print out each of the arguments. Add the following for loop to the main method.
for (int idx = 0; idx < args.length; ++idx) {
    System.out.println(args[idx]);
}
We can run our program from within Eclipse, but we’ll need to give it some
command line arguments. Save your work. Select Run > Run Configurations….
This will pop up a window with a whole bunch of information. Click on the
(x)= Arguments tab. In the Program arguments field, enter one two three
and then click the Run button. This will open a Console tab at the bottom
of your IDE window containing
one
two
three
Select Run > Run Configurations… again and change the arguments to
"Hello world" "How are you?"
Click run again. Notice how the text between the quotation marks is treated as a single argument.
With your partner, Modify the for loop to print out the arguments in reverse order.
Part 2 – Scanning strings
Create a new class called Numbers and have Eclipse add a main() method.
Above the public class Numbers line, add the line
import java.util.Scanner
Inside main, add the code
String numbers = "86 75 309";
Scanner scanner = new Scanner(numbers);

while (scanner.hasNextInt()) {
    int num = scanner.nextInt();
    System.out.println(num);
}
scanner.close();
With your partner, predict what will happen when you run this code. Run the
code by selecting Run > Run.
Did it match what you expected?
Part 3 – Scanning files
Create a new class named Words. Copy the code from Numbers.java into
Words.java. Change the code so that rather than scanning for numbers, the
scanner returns words. To do this, change String numbers = "..." to String
words = "Java is very wordy!" and replace
hasNextInt()
and
nextInt()
with
hasNext()
and
next(),
respectively.
Compile and run your code.
Before moving on, click on one of those links in the paragraph above. That
will take you to the documentation for those methods. Look at what other
methods the
Scanner
class has. What other types can the Scanner read?
Next, change your code to not read from a fixed string, but from a file. You’ll want something like this.
// We need to declare scanner outside the try/catch block so that it is in scope
// when we use it in our loop.
Scanner scanner = null;
try {
    scanner = new Scanner(new File("input.txt"));
} catch (FileNotFoundException e) {
    System.out.println("Problem opening file: " + e.getMessage());
    System.exit(1);
}
Leave the rest of the while loop the same. This will read words from a file
called input.txt.
At this point, Eclipse is probably complaining about your code. It doesn’t
know what
File or
FileNotFoundException
are. Add these import lines next to your other import line.
import java.io.File;
import java.io.FileNotFoundException;
Hopefully, Eclipse is happy now so let’s create our input file. File > New >
Untitled Text File. Enter a few lines of text. Enter whatever you want here.
Save the file, select Warmup1 as the directory and name it input.txt.
Save your work and then compile and run Words.
Notice that it put every word on a line of its own. That’s not great. Change
the System.out.println() to use System.out.print() instead. What do you
think will happen? Try it out.
Okay, that’s not great. Try printing out a space after each word. You can do it via something like this.
String word = scanner.next();
System.out.print(word + " ");
Save and run.
That’s better, but we still lost all of the line breaks!
We can solve this by using multiple scanners. Rather than using
scanner.hasNext() and scanner.next(), we can use
scanner.hasNextLine()
and
scanner.nextLine().
Each call to
scanner.nextLine()
will return a string containing a line of the file.
Inside your while loop, create a new scanner that will scan the line. Your
code might look something like this.
while (lineScanner.hasNextLine()) {
    String line = lineScanner.nextLine();
    Scanner wordScanner = new Scanner(line);
    // other code here
    wordScanner.close();
}
lineScanner.close();
Notice that I’ve given the scanners more distinctive names.
Print out each word in each line using System.out.print() with appropriate
spaces between words. At the end of each line, print a new line via
System.out.println();
Submission
Please add what you found during your warmup to a file called README which will be part of your submission